Nov 23, 2012

Working VPN for SMARTBRO 100% working and Tested!

Dahil its automatically detect ports pwede din po to sa Globe/TM/SUN just reconnect if not browsing...  enjoy i use TM dabest ang connection sa TM...

Sa mga gustong makalibre ng internet at hirap ng makaunvlock ng Sim... eto na ang solution with Port Scanner,.... maari ng iscan ng VPN na to ang available na port para sa SMART/GLOBE/SUN nio pero mas maganda kung SMARTBRO ang gamitin alam naman nating SMARTBRO ang hindi nabloblock  so good luck! i dedelete ko rin tong thread na to after 15days... Maganda ang koneksyon!

Step!
1. Register your trial account - http://www.pdproxy.com/signup.htm
2. Download this VPN - http://www.pdproxy.com/download.htm

no need ng mag manual config just press connect in your finger tips and let the VPN search all working ports!

Note!
in case na madetect at di ka makaconnect, may paraan jan... use different APN

SMART1 SMART2 SMART3 hanggang SMART100

now for a little technical support pag HSDPA ang Signal mo at biglang naging WDMA Signal mo disregard mo lng akala mo block pero a couple ang minutes babalik din sa HSDPA yan... hayaan mo lng...  

and one more... techie, pg di ka makaconnect unplug your Modem and click show debug botton.

tignan nio nlng screen shot and its perfectly working for 10.139 or Smartbro IP  goodluck sainio guys 

para mabypass ang 100mb limit, wag magdidisconnect ng PD PRoxy VPN hayaan nio lng connected  or pag in case madisconnect goto demo 2 then connect pg di makaconnect salitan lng sila.. hanggang makapasok ka...

Nov 13, 2012

Reheal your disconnected Globe Wimax Modem bm622, bm625, bm621 hack, change mac, tune-ups, tweaks & tricks Wimax Tools

Exactly a year since I've been a member here in Symbianize thinking I should give back some of what I've learned.

I've noticed that a lot are still at lost about mac changing and stuffs so I've compiled my knowledge (from Symbianize) and experience about the ever-so-popular bm622 (same to bm621 and bm625) thought it might be useful for beginners and intermediate level users alike. NOT for bm622i
I'll try my best to be as straightforward as possible.

Assuming your Wimax is all set (power, cable connections, external antenna, signals etc)

Lets begin to jump start your Wimax!

Quote:

#Summary
-- copy your wan mac
-- paste it to sniper
-- use the generated live macs
-- enjoy free internet
got it? if not then follow the long version below. 
==============================================
==============================================
Quote:
#Change MAC (Beginner level)

MAC address changing - is use to acquire free internet its much simpler than you think.

*First Step

*Test and Activate your Telnet

-In able to successfully change our mac we need our telnet to be activated.

Press ---> window+R
Type ---> cmd
Type ---> telnet 192.168.1.1

If you're able to enter the login phase then your telnet is activated if not then do the following for Win7:

---> Start
---> Control Panel
---> Programs
---> Programs And Features
---> Turn Windows features on or off
---> Check Telnet Client
---> Hit OK


Note: Late 2010-2011 version can't be activated unless you've downgrade.
you can contact lavaboy if you're interested in downgrading.
lavaboy ---> http://www.symbianize.com/showthread.php?t=616805


Now if all are set, first we need a working MAC here's a DIY (Do-it-yourself) LESS ON TYPE AND MORE ON CLICK procedure:

Download and Run "Wimax Tool" by syntaxerror00100 here:
http://www.symbianize.com/showthread.php?t=655695
(Don't forget to say thanks to him.)

Important: 
From now onwards you must use your Wimax as your main ISP, disconnect any other sources of internet connections and don't use routers or proxies for now.

Procedure #1:

In your browser type ---> 192.168.1.1
Username ----> user
Password ----> user


Highlight "WAN MAC Address value"
Press CTRL+C


Then switch back to "Wimax Tool"
Click ---> "MAC Sniper" tab
Click in ---> "Mac address" box
Press ---> CTRL+V
Select "Random"
Select at least 20 "Tries"
Then hit "Run"

(It will take a while about 40mins or so, so you might wanna do some other stuff.)


After "Wimax Tool" finishes its job, test if you're already connected to the internet if not then follow through:

Still in "Wimax Tool"
Click ---> "Macs management" tab
Select "View MAC's from mac sniper[ALIVE]"


Right Click on any MAC you like
Then select "Use this mac or Test" and wait for modem to reboot.


#Congratulations you're now connected to the world for FREE with no added pain in the a** monthly bill.
(Don't ever beg for MACs, we already have the tool and by tool I mean our brains.)
Tip: Using your own MAC series is recommended for safety precaution.
MAC series examples:
10:C6:1F:XX:XX, 20:2B:C1:XX:XX, 64:16:F0:XX:XX (where X is a corresponding value)

*Want to change your mac the traditional way?
then go here ---> http://www.symbianize.com/showthread.php?t=403963
You still need a working mac for it to work.


==============================================
==============================================
Quote:
#Frequency Tune-Up (Intermediate level)

So you're already connected to the Internet but having unstable connection? then just follow along..

There are many factors regarding our Wimax's stability but the common are signal, frequency and the MAC itself.

MAC - if other users uses the same MAC as you, frequent disconnections etc.
Signal - We need the strongest signal possible, using external antenna might work.
Frequencies - Every area differs stable frequencies, so you might need to do "The process of elimination."

To stabilize our connection we need to tune-up our frequencies.

First we need to access our modem with Administrator right.
Follow the steps in Procedure #1 up to the "Then switch back to "Wimax Tool"
Then
Click ---> "Pass generator" tab
Click in ---> "Input mac" box
Press ---> CTRL+V
Then Click "Generate password"
Copy the generated password


Switch back to your browser type 192.168.1.1
Username ---> admin
Password ---> paste your generated password from "Wimax tool"

In your wimax GUI:
Click ---> WiMAX tab
Click ---> Scanset
Now take note of all the Frequencies listed as we're gonna test each one of them.
This image has been resized. Click this bar to view the full image. The original image is sized 877x513.


Isolate one frequency you want to test then delete everything else.
Click ---> "Apply"
Download any torrent or IDM files, observe which frequency will perform best, repeat isolation procedure until you're satisfy.


Tip: If for example the most stable frequency in your area is 2612000 then that's the only frequency you'll ever need within your area.

Quote:
*Enable Wimax's built in Signal Booster

Press ---> window+R
Type ---> cmd
Type ---> telnet 192.168.1.1
Login ---> wimax
Password ---> wimax820
Type ---> set wimax-sniffer on
Type ---> board reboot

..Credits to Jailbreak

==============================================
==============================================
Quote:
#Config Tweaks (Advance level) Definitely NOT for beginners.

Config Tweaking
-To avoid blank WAN cause by other users.
-Prevents your MAC from being stolen.
-Ease of use, say bye bye to Password generators.
-Theoretically blocks the FWD (Firmware Destroyer)
Tweaking your modem's config is dangerous and risky, it might render your modem useless or brick it so proceed with caution.
Continuing through this process means that you're willing to take the risk and possibly suffer the consequence of bricking your modem.
Try at your own risk! 

Lets start..
Login to your modem's GUI as admin
Go to "Maintain" ---> "Device" ---> "Advance"
Then click "Download Default Configuration File"
and Save it..
Copy your downloaded config to another location to make a back-up (for safety issues)

Now open Wordpad
Open the downloadcarconfigfile

#Telnet Login
Press CTRL+F
Type ---> "telnetpassword" then press Enter
close the "Find" dialog box
then follow the screenshot:
This image has been resized. Click this bar to view the full image. The original image is sized 837x250.


#ACL-WAN protection
Next Press CTRL+F
Type ---> "telnetwanenable" then press Enter (twice)
close the "Find" dialog box
follow the screenshot:
This image has been resized. Click this bar to view the full image. The original image is sized 775x232.


#GUI login
Next Press CTRL+F
Type ---> "userpassword"
close the "Find" dialog box
follow the screenshot:
This image has been resized. Click this bar to view the full image. The original image is sized 790x268.


Then save it and re-upload it back to your modem's config then reboot your modem and we're done!


btw you can also opt for the software protection from lavaboy or syntaxerror00100 to escape the fuzz but the downside is you won't be able to scan for MACs while its active.

lavaboy's
---> http://www.symbianize.com/showthread.php?t=520108
syntaxerror00100's
---> http://www.symbianize.com/showthread.php?t=691864
Any will do, its just a matter of personal preference.

*Other known ways to prevent FWD (Firmware Destroyer)
-Get a good antivirus, Avast free will do.
-Be like a legit, when changing MAC change the serial number that corresponds to the MAC as well.

*In a suspected case of FWD
When you wake up after you left your modem on overnight and all you see is a LAN LED:
-Try to do restore default via GUI or telnet cmd prompt.
-or push the "hard reset button" using a pin or any other appropriate material.
-Never turn your modem off as you'll be likely complete the process of their firmware "destroyer" update.

Quote:
*Hardware protection (Fool-proof anti FWD)
If you have knowledge in hardware or just brave enough then you can try this tutorials for making your own modem's hardware protection:

puliskalawakan's thread 
---> http://www.symbianize.com/showthread.php?t=701361
or
tagok587's thread 
---> http://www.symbianize.com/showthread.php?t=769129

If not then let lavaboy do it for you
---> http://www.symbianize.com/showthread.php?t=602500
BM625 blank WAN solution
go here ---> http://www.symbianize.com/showthread.php?t=757096

BM622 2011 version password generator
go here ---> http://www.symbianize.com/showthread.php?t=806215

more tweaks to follow..

NOTE:

to all na nagpapasalamat sa thread, ur all welcome chiefs. 

if u think nkatulong poko senyo, paki UP nlang po un thread ko sa buy & sell section:
http://www.symbianize.com/showthread.php?t=855336
thank you! 

Please DON'T quote this post.

Nov 3, 2012

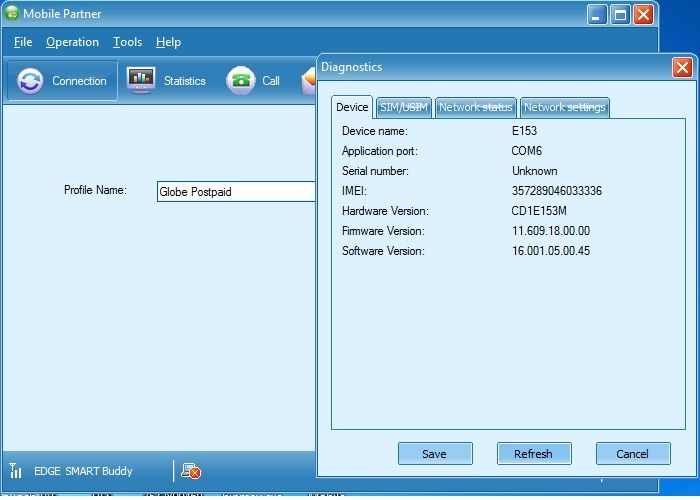
100% Working Smartbro/Globe Tattoo Huawei Unlocker E153 U1, U2 at U3 UNLOCK

Software Needed
1. QPST http://www.x-drivers.com/catalog/fla...pst/12051.html
2. Huawei Flasher Salamat sa tao na gumawa nito. Credits to "FrAnCeScO" http://www.francesco-pompili.it/inde...mary/3/45.html
3. E153 Downgrde Firmware http://www.mediafire.com/?hb86xktz155vrab


1. Backup NVitem (very important)
*Follow nyo nlng kung paano mag backup ng NVitems using QPST sa thread nato.
http://www.symbianize.com/showthread.php?t=819100
2. Downgrading firmware using Huawei Flasher
*Plug your modem, Close dashboard
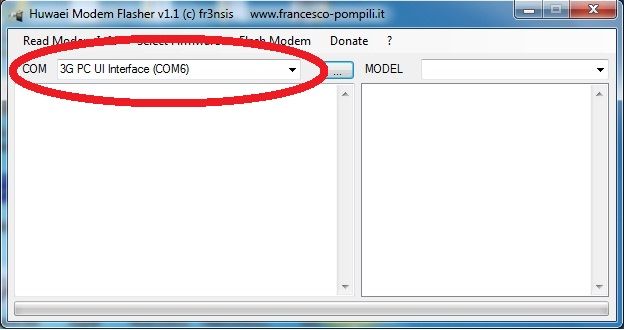
*Run "Huawei Flasher" (No need to install). Dapat my internet connection para gumana ang Flasher.
*See kung detected ang port ng modem

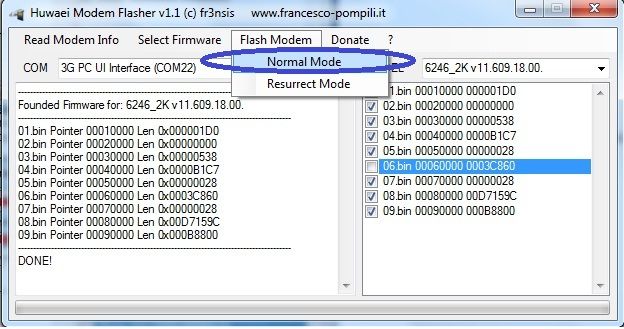
*Click "Select Firmware" at e point nyo sa na download na firmware
ganito ang mangyayari. Dapat 6246_K ang makikita ninyo dyan.

^ e uncheck nyo po yung ika 6 na bin. (kailangan hindi maisama yan para hindi mag error)
*Click "Flash Modem" then "Normal Mode" may popup na lalabas "Press OK if modem is connected" wait 10 sec bago e press ang "OK". Pag na press na ang OK mag lo-load na yung mga bin except bin6 kasi ina uncheck yun. 

^hayaan nyo lng hangang matapos, it itakes several time para matapos yung ika 8 bin. mag error po yan sa huli ng bin 8 pero ok lang yan just replug modem with other sim. Wag nyo muna open dashboard kasi hindi pa yan tapos, mag restor muna.

3. Restore NVitems - pag hindi ninyo ito ginawa hindi successfull ang unlocking ninyo, mawawala pa IMEI ninyo. (A must)
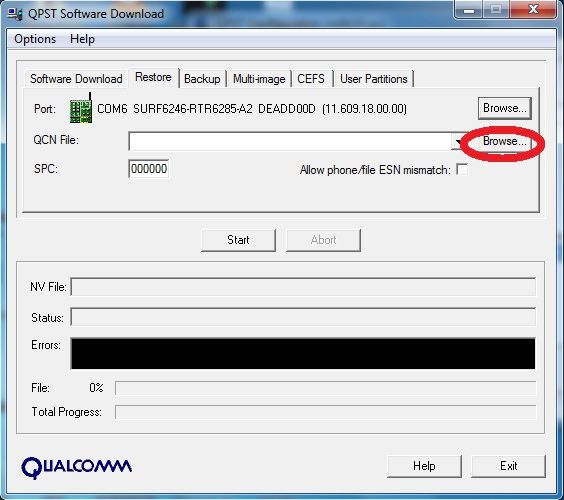
Re-insert lang po yung modem at gamitin ang QPST para ma restore yung NVitems na kinuha natin. Browse nyo lng po kung saan nyo tinago ang backup.


pag tapos na na ma restore re insert modem with other SIM.


SS

Globe

Smart


Wag nyo po akong E PM pag meron kayong tanong, post nyo lng po dito..

Say"thanks" lng ang bayad...

Your Free to update this kind of trick.

For Modems na hindi maka change ng profile like sa smartbro, change nlng ninyo to globe. Itopo link ng updater http://www.mediafire.com/?gznq0ey35nwafu1


Para sa mga modem na na semi brick at detected pa yung "3G UI Interface". Ito gawin nyo para back to Normal ang Modem nyo.
(Credits to Sir Badiding)


1.plug your bricked modem
2.open device manager.Ports(PORTS & LPT)
3.check if your huawei 3g pc ui interface(com#) is detected..take note of the com port #.
4.close globe dashboard
5.connect to internet using another connection(most preferred:smartbro modem or wimax..kz pg globe broadband gmitin mo minsan nagddc xa.if no other means just try to use another globe broadband as long as hnd xa mag dc.
6.open huawei flasher.wait until it detect your bricked modem(checked com port # if it corresponds with the one listed in device manager.
7.select firmware..point to the firmware you downloaded.
8.just uncheck bin 6
9.now this is important..press Flash Modem..then resurrect mode..wait until it reach bin 8 to load until it says failed.
10.close huawei flasher..wait until your modem is detected.and dashboard appear.then close dashboard..unplug modem..
11.reconnect your modem..now check device manager..3G PC UI interface detected and 3G Application interface detected..if both 2 interface are detected..your now ready to flash again your modem but beware plz follow sir moklo tutorials on first page but instead of unchecking bin 6 alone..unchecked nio rin yung bin 8..sa observation ko depende kz sa modem..yung iba ok yung mag error s bin 8..kya yung mga na brick when flashing at hnd na uncheck yung bin 8
plz uncheck bin 8..

AFTER SUCCESFULLY FLUSHING YOUR MODEM.UNPLUG IT AND RECONNECT AGAIN(no sim) .RESTORE MO NA YUNG BACKUP FILES MO..im sure alam mo how to restore back up files.

Pra sa mga nawalang imei eto how to write your imei:
1.QPST tool
2. Qpst configuration
3.add port.check device manager what com port # ang 3g pc ui interface.at yun ang i add mo
4.highlight it..then press Star Client..RF NV item manager..chec mo sa lower right kung tama ba ang com port #..kung hnd click mo yung Setting.,Comport then type yung com port # ng 3g pc ui interface mo.
5. click file.read supported nv items..click #550 NV_UE_
6.may pop up yan sa right corner.click hex.then input your old imei # (printed yan either sa loob or back portion ng modem mo)
ganito ang pag input ng old imei mo (credits to sir moklo):


example IMEI 357289041212679

1st box - just input "8"
2nd box - add letter "a" to the first number 3a
3rd box - invert - "75"
4th box - invert - "82"
5th box - when the next # is 0 like 90 just input "9"
6th box - invert "14"
7th box - invert "12"
8th box - invert "62"
9th box - invert "97"

pg wlang error mareceive ibig sbihin ok na nag imei..unplug modem.
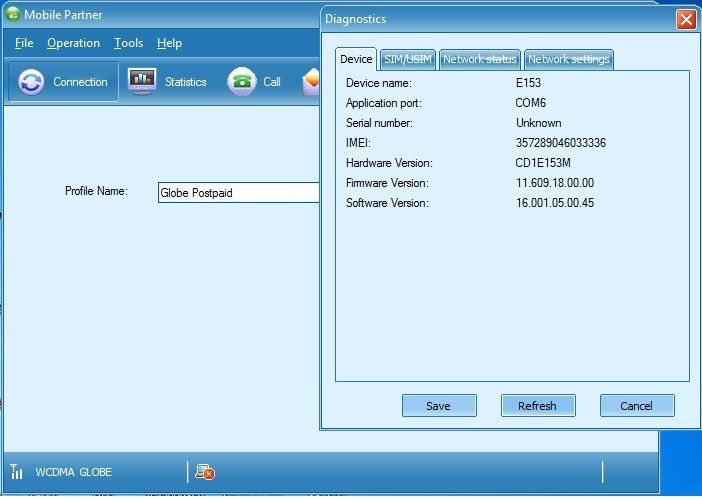
insert mo na smart sim.plug modem and check if your imei is ok sa diagnostics ng broadband mo..

Oct 18, 2012

How to Unlock Huawei E153 USB modem

How to Unlock Huawei E153 USB modem

Huawei e153 modem users find difficulty in unlocking their modems to other networks.
In this tutorial, I will show you how to unlock your E153 modem so that you can use
other network provider services.

Step 1: Download the firmware of your dongle. This upgrade will enable you fix
some bugs and enable your modem to have call feature. You should do
this process so that you can continue to the next process.

Step 2: Huawei Calc by Spockworld.

Step 3 Enter Huawei IMEI and click generate unlock code.

Step 4. Copy the Unlock Code and Flash Code.

Step 5. Insert different Sim Card and run the Modem. When the modem recognized, Run the firmware program then read the instructions.

Step 6. When the screen say enter password, just type the flash code.

Step 7. Run the Huawei Unlocker, Select port connection, select model, click auto-unlock modem, click read mdm data then calculate

Step 8. Open your dashboard or connection manager

Step 9. Go to tools> option > profile management

Step 10. Create a profile
Profile name: Globe
APN.. click static and type this apn: http.globe.com.ph
Access number: *99***1#
Then click ok..now connect to Globe Happy surfing....

Oct 14, 2012

Tutorial for Free Internet on your Android Phone


TsunamiVPN Android Tutorial
  Credit to Symbianize.com


=====================================
HOW TO's : (tested over Sony Ericsson Xperia ARC)

Requirements : (originally posted by cmangalos)
1. Must have a ROOTED ANDROID phone
(there are several ways to root your phone and i wont be able to list down each for every phone, please make time to google)

2. Android Installers (OVPN Settings, OVPN Installer, Busybox, RootExplorer, Terminal Emulator) *
~ files already attached, or you can directly download and install them from Android Market

3. TsunamiVPN OVPN Config and Account (Edit Account.txt with your Log-in Account)
download config files here : CLICK ME
EX:
user11
pass11
4. tun.ko (CLICK HERE for List of TUN.KO available TY to HHubs)

Internet Settings
Name : GLOBE ~ APN : http.globe.com.ph ~ Note : must have minimum of PhP 4.00
Name : SMART ~ APN : internet ~ Note : must have at least 1 pero load to activate 3g/hsdpa, maximum load of PhP 9.00

NO PORT/PROXY/HIGHER AMOUNT OF LOAD CAN BE CONSUMED BY THE INTERNET SERVICE PROVIDER (ISP)

INSTRUCTIONS :
1. Install Root Explorer (You need this to access files on your SD card incase you don't have a file manager installed)

2. Install OpenVPN Binary
a. you can use root explorer to navigate SDcard and install
b. download and install from market
--- click install > choose > /system/xbin/ > /system/xbin/bb
--- check the following path using root explorer to check if successfully installed : /system/xbin/openvpn
Note :
if you get error : "binaries not installed", install busybox first and redo #2
if the binary installation is successful, skip #3


3. Install busybox
--- check the following path using root explorer to check if successfully installed : /system/xbin/busybox

4. install OpenVPN settings :
a. go to option > advanced >
b. check load tun kernel module
c . set path to openvpn binary: /system/xbin/openvpn
d. go to tun module setting > load module using > insmod
set path to tun module:
---if your custom rom comes with a pre-installed tun.ko --> /lib/modules/tun.ko
---if you've downloaded a separate tun.ko, you can place it on your sdcard. make sure to set the correct path /sdcard/openvpn/tun.ko

5. open root explorer and navigate to folder /system/xbin/
--- Mount folder as R/W (upper right corner of your screen)
--- Scroll and look for the file OPENVPN --> Long press openvpn and choose Permissions
--- Put a check on the following:
User: Read + Write + Execute
Group: Read + Execute
Others: Read + Execute

--- Press Menu and Create a new folder. Name it: bb : system/xbin/bb/

6. open terminal emulator and type the following commands :
$ su
# busybox ln -s /system/bin/busybox /system/xbin/bb/ifconfig
# busybox ln -s /system/bin/busybox /system/xbin/bb/route


7. Go back to Root Explorer, navigate to /system/xbin and Mount as R/O (upper right corner of your screen)

8. Save your config file/account file/ovpn cert/tun.ko on your SDCARD under folder "openvpn"

9. Go to OpenVPN Settings and connect to TsunamiVPN.ovpn

10. Enjoy Almost Free internet

Questions? Feel free to post

~ SCREENSHOTS ~
This image has been resized. Click this bar to view the full image. The original image is sized 2875x863.


This image has been resized. Click this bar to view the full image. The original image is sized 2446x863.


Oct 6, 2012

Unlimited VPN(israelo0o11) & FirstBlood VPN(U2ns) IPhone/IPad

Unlimited VPN(israelo0o11) & FirstBlood VPN(U2ns) IPhone/IPad


  • For Globe users just use the inet apn (http.globe.com.ph) and it must be already "Butas"(NOT WORKING ANYMORE)
  • For Smart users just use the inet apn (http.globe.com.ph) -recommended
  • Smart users also can use the default apn (internet)


Requirements
- IFUNBOX and ITunes(IFUNBOX won't run without ITunes)
- Winrar (For extracting purposes)
- Jailbreaked IPhone/IPad with Guizmovpn JAILBREAK YOUR IPHONE?

INSTRUCTION

A.)Transferring Downloaded Configuration From PC to IPhone/IPad

1.) Download a configurations below. The configs are not mine.

Unlimited VPN Configurations
unlimitedispvpn all config smart & globe.zip
unlimitedispvpn smart new config.zip( June 2,2012)
unlimitedispvpn smart new config.zip(New August 2,2012)
Unlimited VPN Smart & Globe configs (September 15,2012) (GLOBE is NOT WORKING YET

FirstBlood VPN Configurations


fbvpn.zip(July 25,2012)
fbvpn.zip(New August 3,2012)
fbvpn.zip(tokyo sever)(August 7, 2012)
fbvpn.zip(bufallo NY server)(August 7,2012)
fbvpn.zip(September 10, 2012)

2.) Extract the Downloaded configuration.
-To extract Right Click on the zip file or "confi_name".zip and Choose "Extract Here".

Note: A extracted folder will appear with the same name of your congiuration.

3.) Plug In your Iphone/ipad to your computer and run IFUNBOX.
4.) At your IFUNBOX find and click "Raw File System" and navigate to derictory var/mobile/Documents/Configurations then drag the extracted folder to IFUNBOX.

Refer to the picture below.

This image has been resized. Click this bar to view the full image. The original image is sized 1366x768.

refer to the picture

5.)After Extracting.Just minimize IFUNBOX and at the desktop create a text file and rename it to "account.txt" without quotations.

-to create a text file just "Right click" on the desktop choose "New" and choose "Text Document".Rename the file to "account.txt" then press "Enter key"

note: In renaming do not include the ".txt" extension it will result on "account.txt.txt" .Some computers hide the file extension so be careful in renaming.

refer to the picture
This image has been resized. Click this bar to view the full image. The original image is sized 920x546.


6.)Open account.txt file and put your unlimited or firstblood username and password.Follow the picture format. "Save" if you done.

refer to the picture.


7.)Maximize your IFUNBOX the open your "config_name" and drag the account.txt inside on it.
This image has been resized. Click this bar to view the full image. The original image is sized 1123x721.


Unlimited vpn TCP & UDP (Globobo & Smarty)

1.)Register for a trial account in http://unlimitedisp.info/register
Note: If your trial period is already expired you can request a free voucher to sir
israelo0o11 here is his number 09215368759 or to sir BroGladz
2.)Download the configuration,Extract and Transfer it from PC to IPhone/IPad...
3.)Go to your IPhone/IPad then open GUIZMOVPN.
4.)Select the configuration and tap the then tap editor and edit the configuration and put account.txt on it.

client
dev tun
proto udp
remote 184.22.194.134 80
resolv-retry infinite
lport 53
tun-mtu 1500
tun-mtu-extra 32
mssfix 1450
persist-key
persist-tun
ca ca.crt
auth-user-pass account.txt
comp-lzo
verb 3

refer to the picture

This image has been resized. Click this bar to view the full image. The original image is sized 960x480.

Free Accounts ng Unlimited VPN from sir BroGladz


5.)Save the edited config then go back to GUIZMOVPN main menu and tap guizmovpn on/off switch.
6.)Go to log and Wait until it says complete sequence.
Quote:
Originally Posted by BroGladz View Post
no problem bro..

edit: bro singit ko na to, free accounts unlimitedisp vpn:

username-> uvpn1 to uvpn15
password-> uvpn
note:
- huwag po palitan ang password,ididisable ko din kung nakita kong napalitan..di rin makakonek..salamat
- isang user sa isang account lang po kung di na makakonek,subukan ibang account.
FirstBlood vpn UDP (Globobo & Smarty)

1.)Create an account.Register to http://www.firstbloodvpn.info/forum/
2.)Download the configuration,Extract and Transfer it from PC to IPhone/IPad...
3.)Go to your IPhone/IPad then open GUIZMOVPN.
4.)Select the configuration and tap the then tap editor and edit the configuration and put account.txt on it.

client
dev tun
proto udp
remote 75.127.3.170 80
keepalive 10 120
resolv-retry infinite
redirect-gateway def1
tun-mtu 1500
tun-mtu-extra 32
comp-lzo
mute 3
mute-replay-warnings
float
ping-timer-rem
lport 53
mssfix 1450
persist-key
persist-tun
ca ca.crt
route-method exe
auth-user-pass "account.txt"
reneg-sec 0
verb 1
script-security 2 system
route-delay 2
dhcp-option DISABLE-NBT


refer to the picture

This image has been resized. Click this bar to view the full image. The original image is sized 960x480.


5.)Save the edited config then go back to GUIZMOVPN main menu and tap guizmovpn on/off switch.
6.)Go to log and Wait until it says complete sequence.
Quote:
Originally Posted by u2ns
We are now accepting any donations to sustain FBVPN server cost and maintenance

Please DONATE:
Gcash and Share Aload: 09262494026
Paypal account: yoltoons@yahoo.com


note: if you can't edit the config use your computer or use iFile.
another note: to be able to edit the config send the config through wifi.

Special Thanks to this people
mam Trini2224 -nang dahil hosplots nagka interesado ako sa VPN
sir U2ns - Nang dahil sa Firstblood VPN nagkaroon ng pag asa sa browsing at downloading
sir israelo0o11 -Nang dahil sa Unlimited VPN indi na block ang smarty ko
sir jerryodonzo - Wag kang pa cute lalo kang papangit..hehe[/CENTER]